

Last week, a reader named Jake emailed me: "Hello NealLau, I purchased cannabis growing tools last month, but now some of my plants are growing well while others look wilted. I don't know what's happening. Can you help me?"
To be honest, I didn't get great results with my first grow either. This situation is very common for beginners.
Today, I'd like to take this opportunity to share some practical cannabis cultivation experiences. Through some useful guidance, even complete beginners can easily start how to grow weed at home.

Why Your First Cannabis Plant Should Grow Indoors
When I transitioned from outdoor to indoor growing, I discovered I no longer had to worry about light, weather, temperature, humidity, and other issues. I could control the growing environment myself, which resulted in better quality.
Complete Control: When you grow indoor weed, you have complete control over light, humidity, and nutrients, resulting in consistently high-quality cannabis with enhanced potency and flavor characteristics.
Privacy and Convenience: Indoor weed growing allows you to discreetly grow in apartments or houses without outdoor space. No backyard? No problem! You can grow a weed plant in a closet, spare room, or even a grow tent.
Year-round Harvests: Unlike outdoor growing, how to grow indoor cannabis isn't limited by seasons or weather conditions. You can grow multiple harvests year-round, even in winter.
Pest Prevention: Indoor environments significantly reduce the risk of pests and contamination that outdoor plants often face.
Seed to Harvest Timeline for Cannabis

Before you start growing, let's understand the overall process of how to grow the weed:
- Germination Phase (1-7 days): Seeds germinate and develop their first small leaves (cotyledons).
- Seedling Phase (2-3 weeks): Young plants develop their first true leaves and establish root systems.
- Vegetative Growth Phase (3-8 weeks): Plants focus on growing stems, branches, and leaves. This is when you'll see the fastest growth.
- Flowering Phase (8-11 weeks): Plants develop buds and resin. Time varies greatly depending on strain.
- Harvest Phase: Harvesting mature plants at optimal potency.
- Drying Phase (7-10 days): Hanging harvested branches to gradually remove moisture.
- Curing Phase (at least 2 weeks): Storing buds in containers to develop flavor and smoothness.
From seed to smokable product, the entire process takes approximately 3-6 months. My first autoflower grow took only 85 days to complete, while some traditional photoperiod varieties took over 5 months to mature.
Cannabis Growing Tutorial
Next, are you ready to learn how to grow weed indoors? Let's get hands-on!
Step 1: Choose Your Growing Space

The first decision in learning how to grow a weed plant is where you'll grow it. You don't need a large area—I initially started in a 2×2×4 feet /150 * 150 * 200cm grow tent, which provided enough yield for my personal needs.
Other spaces where you can grow:
- Spare closet or cabinet
- Grow tent (currently my preference because it's good for containment and light control)
- Isolated corner of a spare room
- Purpose-built grow box
Step 2: Choose Your Cannabis Grow Lights

Lighting is arguably the most critical factor when growing weed indoors. Plants directly convert light energy into bud production—better light means better harvests.
Lighting Options for Indoor Cannabis
HID (High-Intensity Discharge) Lights: These include Metal Halide (MH) and High-Pressure Sodium (HPS) lights. They have higher calories and are cheaper options among grow lights for weed, although they tend to consume more power and produce more heat.
LED Grow Lights: Modern LED technology has revolutionized indoor cannabis growing. Quality LEDs provide full-spectrum lighting while using less electricity and producing less heat than HID lights.
After upgrading to an 800W LED Grow Light, my electricity bill dropped by about 35%, and my grow space stayed cooler. The initial investment was high (my 800w grow light cost R8119 (about $445)), but has paid for itself through energy savings and improved harvests. Many experienced growers now consider these the most efficient grow lights for weed on the market.
Fluorescent Lights: T5 high-output fluorescents are effective for seedlings and small grows. They're affordable and don't produce much heat, but aren't ideal for growing cannabis to maturity.
Step 3: Choose Your Growing Medium
When growing weed, the medium your plants grow in has a major impact on their health, growth speed, and your maintenance requirements.
Soil: A Choice for Beginners
For beginners learning how to grow weed indoors, growing in soil is a good option. However, you may need to add some nutrients during various plant growth stages.
Coco Coir: An Intermediate Option
Coco coir is made from coconut husks and offers advantages of both soil and hydroponics. It's more forgiving than pure hydroponic systems while providing better oxygenation than soil.
When I started using the Grow Lekker cocopeat Perlite Mix with a 70% cocopeat + 30% perlite formula, my plants noticeably grew faster but required more frequent feeding.
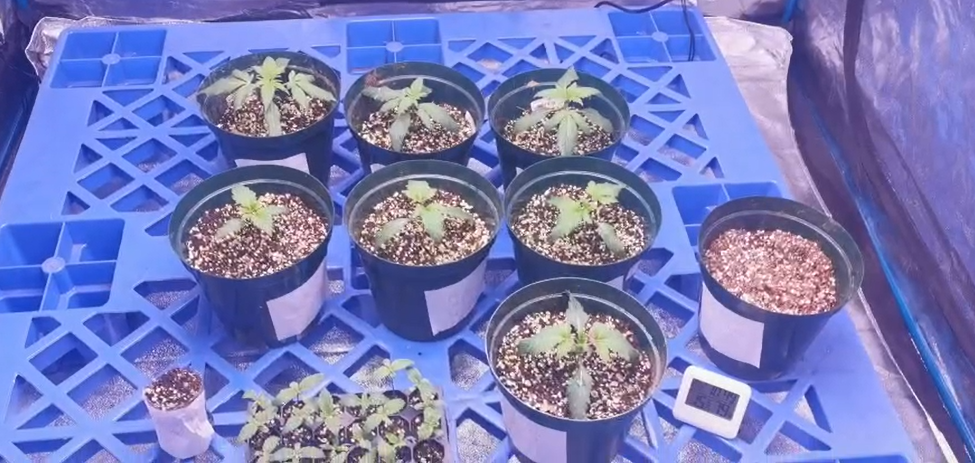
Step 4: Choose Containers for Cannabis Plants
Your container choice affects watering frequency, root development, and ultimately plant size.
Fabric Pots: Enhance root aeration and prevent root circling
Plastic Containers: Cheap and easily available (ensure proper drainage)
Air Pots: Specialized containers that promote root pruning and healthier root systems
For beginners growing weed, I recommend 5-gallon fabric pots. These breathable containers promote healthy root development through "air pruning," preventing the root circling problems common in plastic containers.
If using plastic containers, ensure they have sufficient drainage holes. Cannabis roots are extremely susceptible to rot in standing water.
Step 5: Set Up Your Ventilation System
When growing weed indoors, proper airflow is crucial. Plants need fresh carbon dioxide for photosynthesis, and stagnant air leads to mold, mildew, and pest problems.
A basic ventilation system includes:
Exhaust Fan: Removes hot air from your grow space. I installed mine near the top of the space since hot air rises.
Carbon Filter: Connected to the exhaust fan, eliminates the distinctive cannabis odor.
Intake: Allows fresh air in. This can be passive (just an opening) or active (using an intake fan).
Circulation Fans: Small oscillating fans within the grow space keep air moving around plants. This strengthens stems and prevents humidity buildup around leaves.
My first grow encountered powdery mildew due to poor air circulation, until I improved air movement. Now I use two small clip fans on each side of the tent, creating gentle but constant airflow that keeps problems away.
The ideal temperatures for growing weed are 70-80°F (21-27°C) during light periods and 60-70°F (15-21°C) during dark periods. A simple digital temperature humidity hygrometer device is essential equipment.
Step 6: Choose Cannabis Nutrients
In the indoor growing process, cannabis requires specific nutrients throughout its lifecycle. The main macronutrients are:
Nitrogen (N): Important for leaf and stem development during vegetative growth.
Phosphorus (P): Critical for bud production during flowering.
Potassium (K): Important for overall plant function and stress resistance throughout the lifecycle.
Cannabis also needs smaller amounts of secondary nutrients (calcium, magnesium, sulfur) and micronutrients (iron, zinc, manganese, etc.).
Unless you're using pre-fertilized organic soil, you'll need to feed your plants nutrient solution weekly. These are liquid concentrates or powders mixed with water, with different formulations for vegetative and flowering stages.
Start with half the recommended strength to avoid nutrient burn.
A pH meter is essential for ensuring proper nutrient absorption. Keep pH between 6.0-7.0 for soil and 5.5-6.5 for hydroponics.
Step 7: Watering Cannabis Plants

Proper watering is a surprisingly tricky aspect of growing weed indoors.
Both underwatering and overwatering cause stress, but overwatering is more common among beginners.
Cannabis roots need oxygen as well as water. When soil remains consistently wet, roots can't breathe properly.
My rule of thumb is: wait until the top inch/3cm of soil feels dry before watering.
For cannabis in fabric pots with good soil, I typically water every 2-3 days, adjusting based on plant size, temperature, and humidity. Smaller plants or those in larger containers need less frequent watering.
When you do water, water thoroughly until you see about 20% runoff from the drainage holes. This complete saturation ensures the entire root zone is evenly moistened and helps flush accumulated salts.
If your tap water has high levels of chlorine or chloramines, consider letting it sit overnight or using a basic carbon filter.
My local water contains moderate chlorine levels, so I generally fill containers a day before watering to let the chlorine dissipate.
Step 8: Environmental Control for Cannabis
Successful weed growing requires maintaining proper temperature and humidity levels during each growth stage.
Temperature:
- Seedlings/Clones: 72-77°F (22-25°C)
- Vegetative Growth: 70-85°F (21-29°C)
- Flowering: 65-80°F (18-26°C)
Humidity:
- Seedlings/Clones: 65-70%
- Early Vegetative: 50-70%
- Late Vegetative: 40-60%
- Early Flowering: 40-50%
- Late Flowering: 30-40%
Step 9: Vegetative Growth

This phase typically lasts 3-8 weeks, depending on your desired plant size and grow space. During this time, provide 18 hours of light daily to maximize growth.
Training Techniques for Indoor Growing:
When suitable for growing weed, using training techniques helps control height while maximizing yield:
Low-Stress Training (LST): Gently bending and securing branches horizontally to create an even canopy, typically using soft garden ties to secure branches.
Topping: Cutting off the main growth tip to encourage the plant to grow multiple main stems instead of one, usually done when the plant has 4-5 nodes, which increases the number of main colas.
Screen of Green (SCROG): Use plant support netting to train branches and create an even canopy.
Step 10: Harvesting, Drying, and Curing
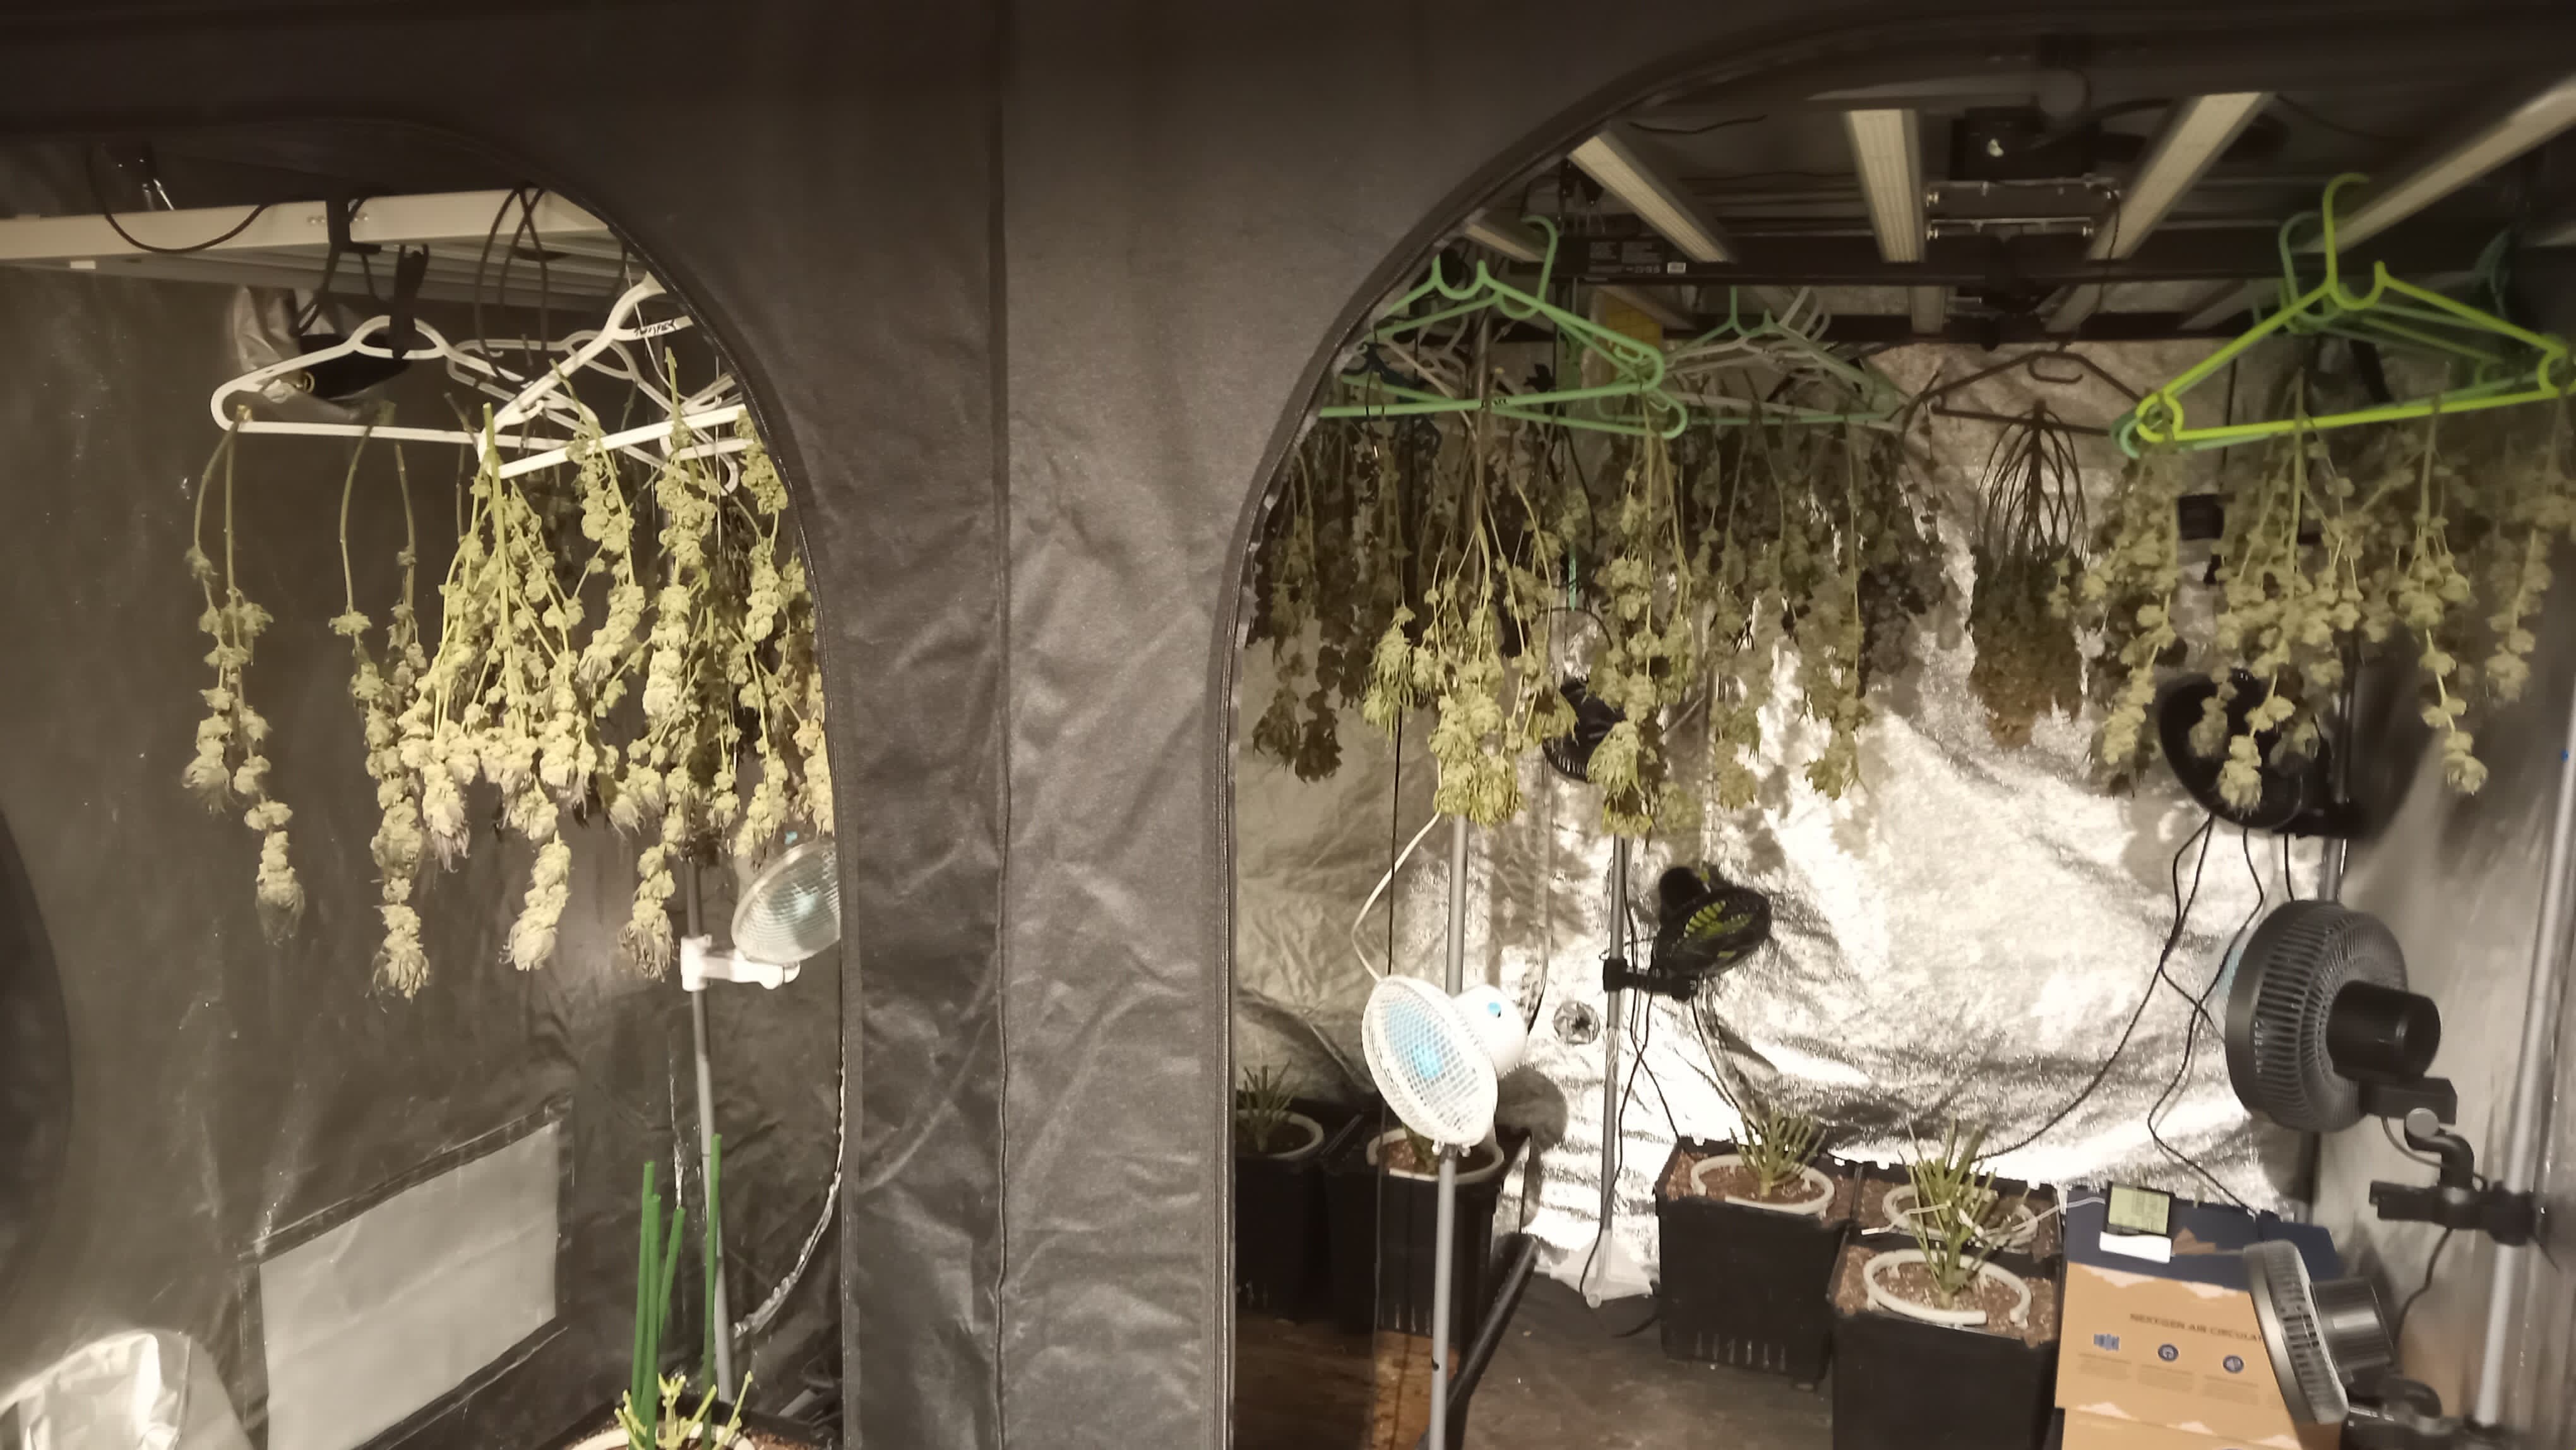
After 8-11 weeks of flowering (depending on strain), your plants will be ready for harvest. The biggest mistake beginners make is harvesting too early. Patience during these final weeks significantly impacts potency and yield.
Use a jeweler's loupe or digital microscope to examine the trichomes (resin glands). Clear trichomes indicate immaturity. Harvest when most trichomes have turned cloudy white with some amber beginning to appear. More amber trichomes produce more sedative effects.
My first harvest was about two weeks premature due to impatience—the resulting buds were noticeably less potent than later harvests where I waited for proper trichome development.
For harvesting, I section-cut the plant, remove large fan leaves, and hang branches upside down in a dark room with a temperature around 60°F and 50% humidity, with slight air circulation. The drying process typically takes 7-10 days. When smaller stems can snap rather than bend, the buds are ready.
After drying, trim the buds more carefully and transfer them to glass mason jars for curing. During the first two weeks, open the jars for 15-30 minutes daily to release moisture and prevent mold (called "burping"). Afterward, reduce to once every few days for at least two more weeks.
Conclusion:
Through this guide, I hope to help you avoid the mistakes I initially made. How to grow weed is a learning process—each harvest will be better than the last. Don't be afraid to make mistakes, document your process, and adjust your techniques with each growing cycle. Mastering the skill of growing high-quality cannabis will bring you lasting rewards.
For related growing equipment, check out Theonegrow's website.
FAQs
When should I stop using grow lights?
Turn off your grow lights 24-48 hours before harvest for a final dark period. This stresses the plant just enough to boost trichome production and potentially increase THC levels. During the entire growing cycle, follow 18/6 hours light/dark for vegging and 12/12 for flowering. After harvest, lights aren't needed during drying and curing phases.
Can weed go bad after 2 months?
Properly cured and stored cannabis can last 6-12 months while maintaining quality. After 2 months, if stored in airtight glass jars in a cool, dark place with proper humidity (58-62%), your weed should still be excellent. However, improper storage can lead to mold, degraded THC, or dried-out buds that smoke harshly. Use humidity packs and check regularly for best results.
How to grow weed from seed?
Start by germinating seeds between damp paper towels until they sprout (1-5 days). Plant taproot-down in light, airy soil, 1/4 inch deep. Keep humidity at 70-80% and temperature around 75°F (24°C). Use gentle light (CFL or low-power LED) 18-24 hours daily. Water sparingly around the seedling, not directly on it. Within 1-2 weeks, your baby plants will develop their first true leaves.